Phần 2: GIAO TIẾP VỚI RASPBERRY PI VÀ SQL SERVER

Tiếp tục phần 1 về giao tiếp cơ bản giữa Arduino và module AS608 thì ở phần 2 sẽ nâng cao hơn tí, cụ thể sẽ sử dụng ngôn ngữ Python trên Raspberry Pi để giao tiếp và có kết hợp lưu trữ trên database (SQL Server) nhằm nhận diện tên người có dấu vân tay đó.
Khỏi phải chờ đợi lâu, chúng ta tiến hành thôi nào…
1. Cấu hình Uart trên Rasp Pi
- Vào Raspberry Pi Configuration -> Bật Serial Port (KHÔNG bật Serial Console nhé)
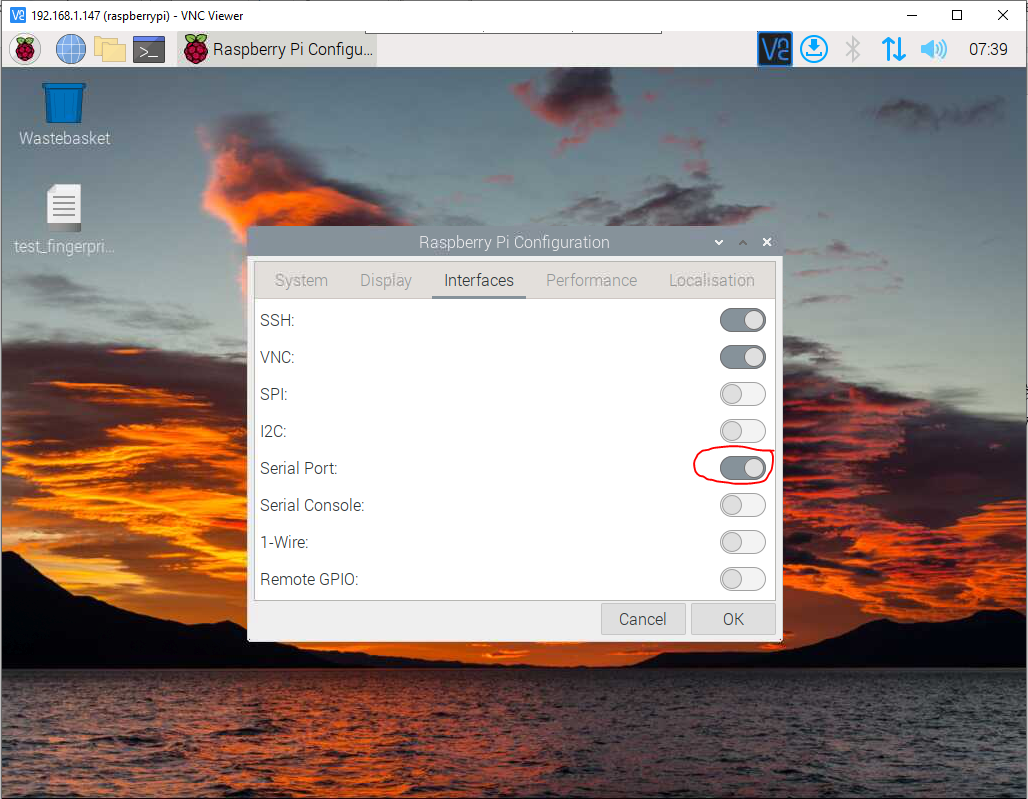
Hoặc có thể dùng sudo nano /boot/config.txt -> thêm enable_uart= 1 vào cuối.
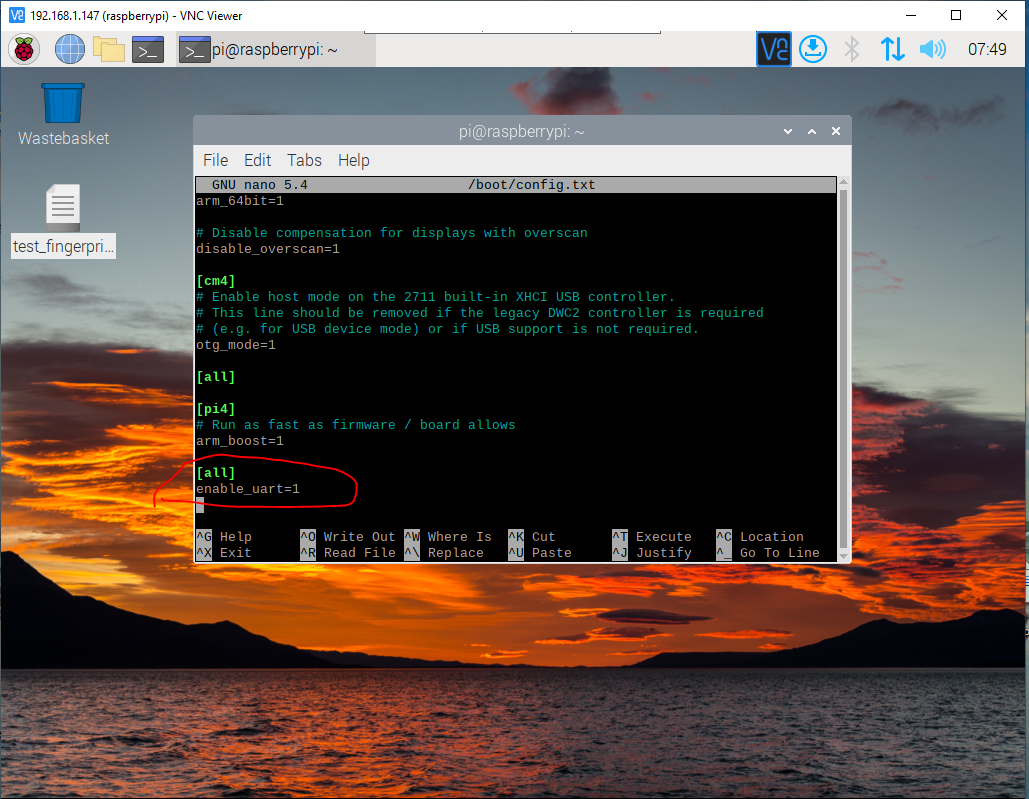
Sau đó REBOOT lại Rasp Pi nhé.
2. Cài thư viện Fingerprint
Hiện mình đang dùng thư viện fingerprint của Adafruit nên sẽ cài như sau:
sudo pip3 install adafruit-circuitpython-fingerprint
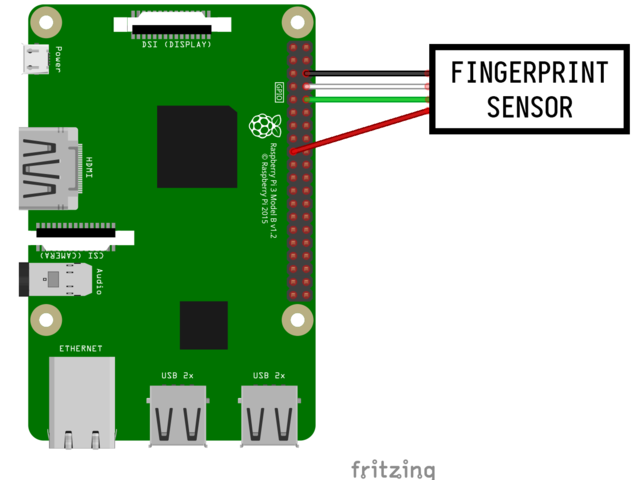
3. Nối dây module AS608 với Rasp Pi
| Module AS608 | Raspberry Pi |
| Tx | Rx (GPIO15) |
| Rx | Tx (GPIO14) |
| Vcc | 3.3V |
| GND | GND |
4. Cấu hình Rasp Pi giao tiếp SQL Server
SQL Server hay còn gọi là Microsoft SQL Server, là một phần mềm quản trị cơ sơ dữ liệu quan hệ được phát triển bởi microsoft bao gồm: tạo, duy trì, phân tích dữ liệu,… dễ dàng sử dụng để lưu trữ cho các dữ liệu dựa trên tiêu chuẩn RDBMS – Relational Database Management System.
SQL Server được xây dựng dựa trên SQL, được tối ưu để có thể chạy trên môi trường cơ sở dữ liệu rất lớn lên đến Tera – Byte cùng lúc phục vụ cho hàng ngàn user. SQL Server cung cấp đầy đủ các công cụ cho việc quản lý từ nhận diện GUI đến sử dụng ngôn ngữ cho việc truy vấn SQL.
SQL Server thường đi kèm với việc thực hiện riêng các ngôn ngữ SQL, T – SQL, cụ thể như sau:
- SQL Server Management Studio: công cụ giao diện chính cho máy chủ, hỗ trợ cho môi trường 64 bit và 32 bit.
- T – SQL: là ngôn ngữ thuộc quyền sở hữu của Microsoft hay còn được gọi là Transact – SQL.
Bước 1 – Đầu tiên bạn cần cài đặt Driver giao tiếp SQL Server trên Rasp Pi trước.
Xem chi tiết ở link:
Hiện mình đang dùng Debian 11 nên mình thực hiện các lệnh theo trình tự như sau (LƯU Ý: nếu bạn dùng bản OS 32bit sẽ không cài được, mà cần bản OS 64bit nhé):
|
1 2 3 4 5 6 7 8 9 10 11 12 13 14 15 16 17 18 19 20 |
sudo su curl https://packages.microsoft.com/keys/microsoft.asc | apt-key add - #Download appropriate package for the OS version #Choose only ONE of the following, corresponding to your OS version #Debian 11 curl https://packages.microsoft.com/config/debian/11/prod.list > /etc/apt/sources.list.d/mssql-release.list exit sudo apt-get update sudo ACCEPT_EULA=Y apt-get install -y msodbcsql18 # optional: for bcp and sqlcmd sudo ACCEPT_EULA=Y apt-get install -y mssql-tools18 echo 'export PATH="$PATH:/opt/mssql-tools18/bin"' >> ~/.bashrc source ~/.bashrc # optional: for unixODBC development headers sudo apt-get install -y unixodbc-dev # optional: kerberos library for debian-slim distributions sudo apt-get install -y libgssapi-krb5-2 |
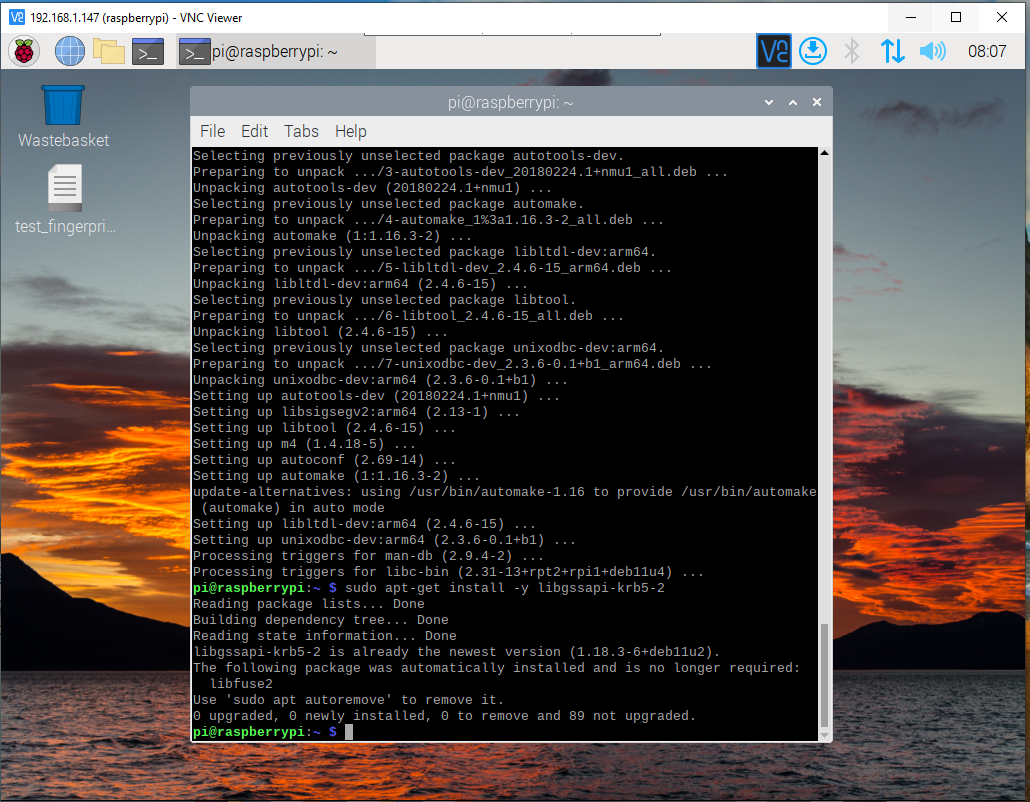
Bước 2: Chạy sudo -H pip install pyodbc
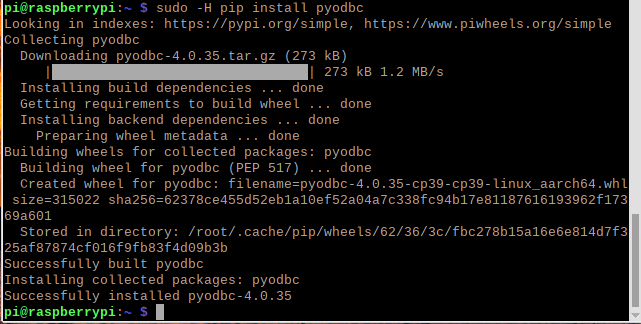
Lúc này mình sẽ test thử Raspi Pi giao tiếp được SQL Server được chưa nhé:
- Trước mắt bạn cần cài SQL Server vào máy, sau đó cài thêm SQL Server management Studio (Phần này các bạn lên google tìm cách cài nhé).
- Trong Studio, vào Security -> Logins để tạo user và password bạn sử dụng.
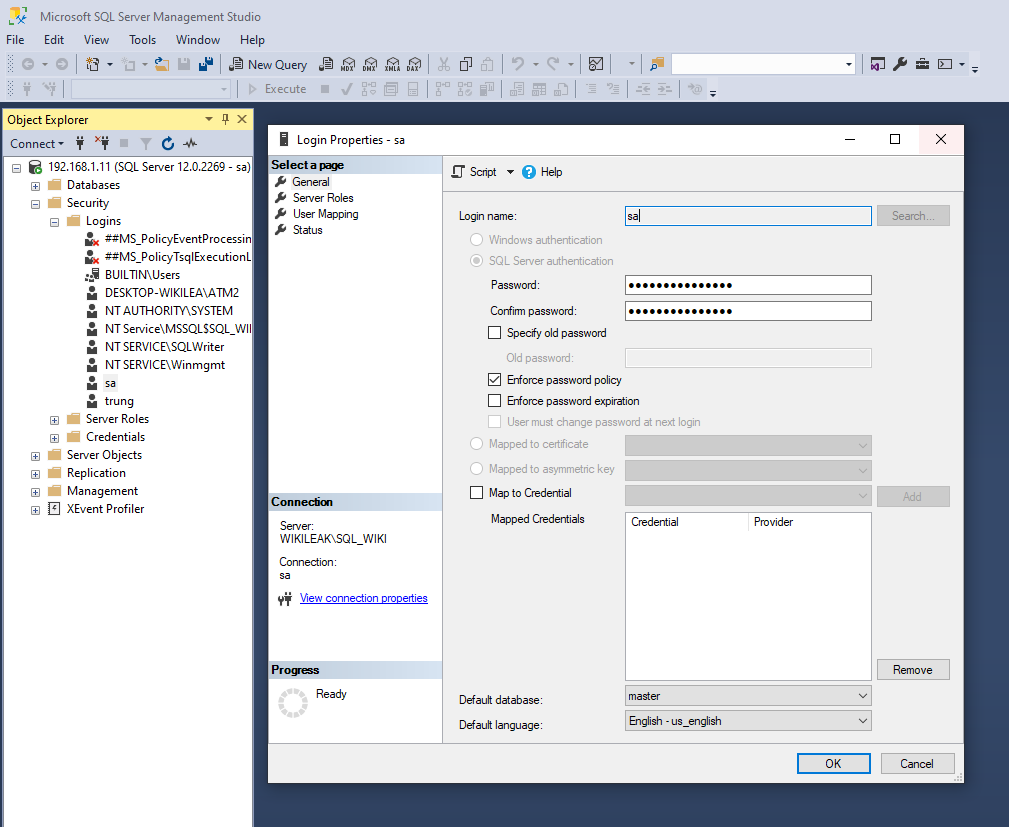
- Hiện mình tạo thử 1 table dtb1 để test thử.
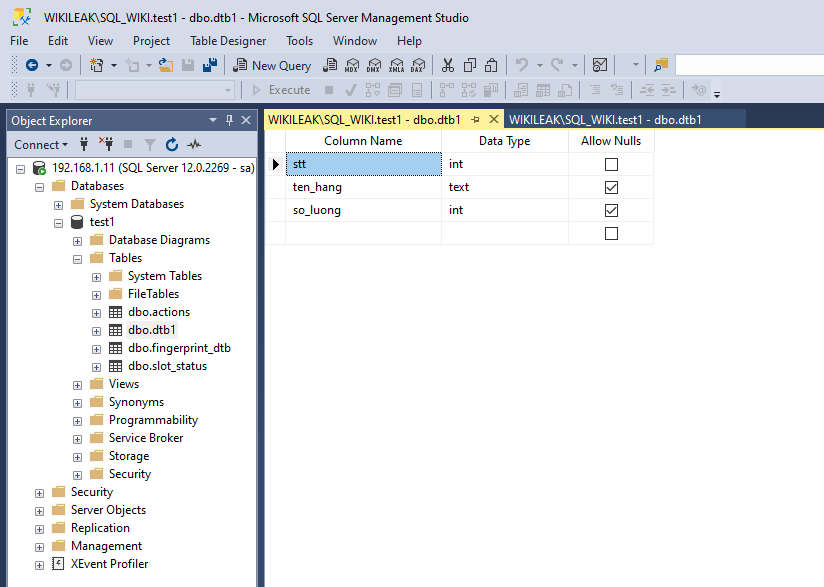
- Code test của mình, bạn đổi các thông tin IP, database, port, user và pass nhé. (Ngôn ngữ mình sử dụng là Python nhé).
|
1 2 3 4 5 6 7 8 9 10 11 12 13 14 15 16 17 18 19 20 21 22 23 24 |
import pyodbc conn = pyodbc.connect('Driver={ODBC Driver 18 for SQL Server};' 'Server=192.168.1.11;' 'Database=test1;' 'Port=1433;' 'Uid=sa;' 'Pwd=123456;' 'TrustServerCertificate=yes') cursor = conn.cursor() cursor.execute('SELECT * FROM dtb1') for i in cursor: print(i) |
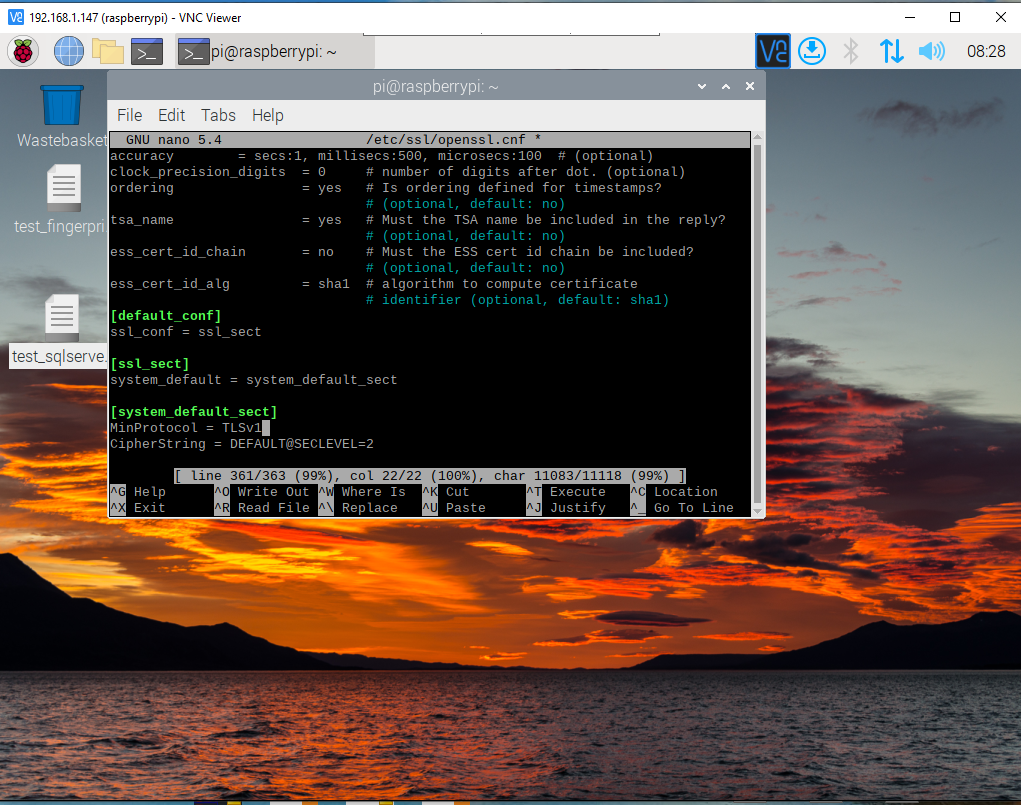
Nếu các bạn chạy ra lỗi liên quan SSL như dưới thì thực hiện
sudo nano /etc/ssl/openssl.cnf
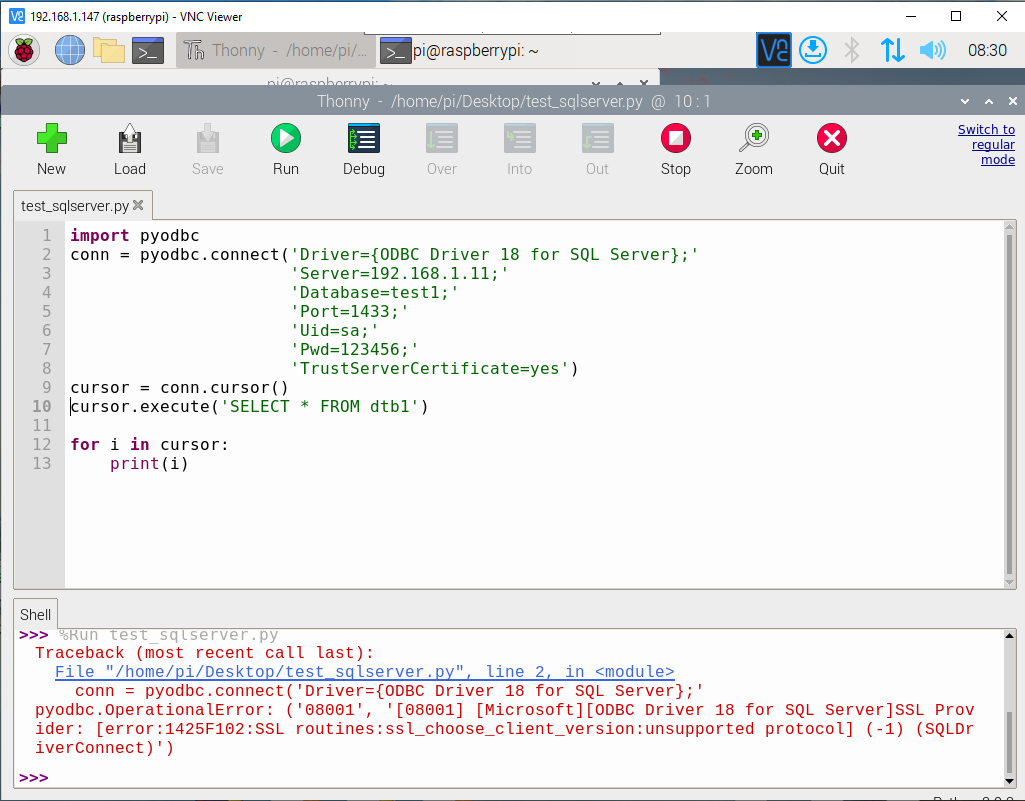
Tiến hành đổi ở dòng gần cuối file MinProtocol = TLSv1.2 sang MinProtocol = TLSv1 là sẽ giải quyết được nhé.
5. Code chính
|
1 2 3 4 5 6 7 8 9 10 11 12 13 14 15 16 17 18 19 20 21 22 23 24 25 26 27 28 29 30 31 32 33 34 35 36 37 38 39 40 41 42 43 44 45 46 47 48 49 50 51 52 53 54 55 56 57 58 59 60 61 62 63 64 65 66 67 68 69 70 71 72 73 74 75 76 77 78 79 80 81 82 83 84 85 86 87 88 89 90 91 92 93 94 95 96 97 98 99 100 101 102 103 104 105 106 107 108 109 110 111 112 113 114 115 116 117 118 119 120 121 122 123 124 125 126 127 128 129 130 131 132 133 134 135 136 137 138 139 140 141 142 143 144 145 146 147 148 149 150 151 152 153 154 155 156 157 158 159 160 161 162 163 164 165 166 167 168 169 170 171 172 173 174 175 176 177 178 179 180 181 182 183 184 185 186 187 188 189 190 191 192 193 194 195 196 197 198 199 200 201 202 203 204 205 206 207 208 209 210 211 212 213 214 215 216 217 218 219 220 221 222 223 224 225 226 227 228 229 230 231 232 233 234 235 236 237 238 239 240 241 242 243 244 245 246 247 248 249 250 251 252 253 254 255 256 257 258 259 260 261 262 263 264 265 266 267 268 269 270 271 272 273 274 275 276 277 278 279 280 281 282 283 284 285 286 287 288 289 290 291 292 293 294 295 296 297 298 299 300 301 302 303 304 305 306 307 308 309 310 311 312 313 314 315 316 317 318 319 320 321 322 323 324 325 326 327 328 329 330 331 332 333 334 335 336 337 338 339 340 341 342 343 344 345 346 347 348 349 350 351 352 353 354 355 356 357 358 359 360 361 362 363 364 365 366 367 368 369 370 371 372 373 374 375 376 377 378 379 380 381 382 383 384 385 386 387 388 389 390 391 392 393 394 395 396 397 398 399 400 401 402 403 404 405 406 407 408 409 410 411 412 413 414 415 416 417 418 419 420 421 422 423 424 425 426 427 428 429 430 |
# SPDX-FileCopyrightText: 2021 ladyada for Adafruit Industries # SPDX-License-Identifier: MIT import time import board #import busio from digitalio import DigitalInOut, Direction import adafruit_fingerprint import pyodbc led = DigitalInOut(board.D13) led.direction = Direction.OUTPUT #uart = busio.UART(board.TX, board.RX, baudrate=57600) # If using with a computer such as Linux/RaspberryPi, Mac, Windows with USB/serial converter: # import serial # uart = serial.Serial("/dev/ttyUSB0", baudrate=57600, timeout=1) # If using with Linux/Raspberry Pi and hardware UART: import serial uart = serial.Serial("/dev/ttyS0", baudrate=57600, timeout=1) finger = adafruit_fingerprint.Adafruit_Fingerprint(uart) pyodbc.drivers() conn = pyodbc.connect('Driver={ODBC Driver 18 for SQL Server};' 'Server=192.168.1.11;' 'Database=test1;' 'Port=1433;' 'Uid=sa;' 'Pwd=123456;' 'TrustServerCertificate=yes') cursor = conn.cursor() ################################################## def get_fingerprint(): """Get a finger print image, template it, and see if it matches!""" print("Waiting for image...") while finger.get_image() != adafruit_fingerprint.OK: pass print("Templating...") if finger.image_2_tz(1) != adafruit_fingerprint.OK: return False print("Searching...") if finger.finger_search() != adafruit_fingerprint.OK: return False return True # pylint: disable=too-many-branches def get_fingerprint_detail(): """Get a finger print image, template it, and see if it matches! This time, print out each error instead of just returning on failure""" print("Getting image...", end="") i = finger.get_image() if i == adafruit_fingerprint.OK: print("Image taken") else: if i == adafruit_fingerprint.NOFINGER: print("No finger detected") elif i == adafruit_fingerprint.IMAGEFAIL: print("Imaging error") else: print("Other error") return False print("Templating...", end="") i = finger.image_2_tz(1) if i == adafruit_fingerprint.OK: print("Templated") else: if i == adafruit_fingerprint.IMAGEMESS: print("Image too messy") elif i == adafruit_fingerprint.FEATUREFAIL: print("Could not identify features") elif i == adafruit_fingerprint.INVALIDIMAGE: print("Image invalid") else: print("Other error") return False print("Searching...", end="") i = finger.finger_fast_search() # pylint: disable=no-else-return # This block needs to be refactored when it can be tested. if i == adafruit_fingerprint.OK: print("Found fingerprint!") return True else: if i == adafruit_fingerprint.NOTFOUND: print("No match found") else: print("Other error") return False # pylint: disable=too-many-statements def enroll_finger(location): """Take a 2 finger images and template it, then store in 'location'""" for fingerimg in range(1, 3): if fingerimg == 1: print("Place finger on sensor...", end="") else: print("Place same finger again...", end="") while True: i = finger.get_image() if i == adafruit_fingerprint.OK: print("Image taken") break if i == adafruit_fingerprint.NOFINGER: print(".", end="") elif i == adafruit_fingerprint.IMAGEFAIL: print("Imaging error") return False else: print("Other error") return False print("Templating...", end="") i = finger.image_2_tz(fingerimg) if i == adafruit_fingerprint.OK: print("Templated") else: if i == adafruit_fingerprint.IMAGEMESS: print("Image too messy") elif i == adafruit_fingerprint.FEATUREFAIL: print("Could not identify features") elif i == adafruit_fingerprint.INVALIDIMAGE: print("Image invalid") else: print("Other error") return False if fingerimg == 1: print("Remove finger") time.sleep(1) while i != adafruit_fingerprint.NOFINGER: i = finger.get_image() print("Creating model...", end="") i = finger.create_model() if i == adafruit_fingerprint.OK: print("Created") else: if i == adafruit_fingerprint.ENROLLMISMATCH: print("Prints did not match") else: print("Other error") return False print("Storing model #%d..." % location, end="") i = finger.store_model(location) if i == adafruit_fingerprint.OK: print("Stored") else: if i == adafruit_fingerprint.BADLOCATION: print("Bad storage location") elif i == adafruit_fingerprint.FLASHERR: print("Flash storage error") else: print("Other error") return False return True ################################################## def get_num(): """Use input() to get a valid number from 1 to 127. Retry till success!""" i = 0 while (i > 127) or (i < 1): try: i = int(input("Enter ID # from 1-127: ")) except ValueError: pass return i while True: print("----------------") if finger.read_templates() != adafruit_fingerprint.OK: raise RuntimeError("Failed to read templates") print("Fingerprint templates:", finger.templates) print("e) enroll print") print("f) find print") print("d) delete print") print("----------------") c = input("> ") if c == "e": #Add new fingerprint id = get_num() enroll_finger(id) name = input("Name> ") cursor.execute('SELECT * FROM fingerprint_dtb WHERE id = ?', id) records = cursor.fetchall() if len(records) == 0: #ID not in database cursor.execute('INSERT INTO fingerprint_dtb (id, name) VALUES (?,?)',(id, name)) conn.commit() else: #update data when ID is exsit cursor.execute('UPDATE fingerprint_dtb SET name = ? WHERE id = ?', name, id) conn.commit() print('Add new fingerprint finnish!') if c == "f": #Find fingerprint if get_fingerprint(): cursor.execute('SELECT * FROM fingerprint_dtb WHERE id = ?', finger.finger_id) records = cursor.fetchall() name = records[0][1] print("Detected ID#", finger.finger_id,'- Name:',name,"- with confidence", finger.confidence) else: print("Finger not found") if c == "d": #Delete fingerprint id = get_num() if finger.delete_model(id) == adafruit_fingerprint.OK: cursor.execute('DELETE FROM fingerprint_dtb WHERE id = ?', id) conn.commit() print("Deleted!") else: print("Failed to delete") |
Giải thích:
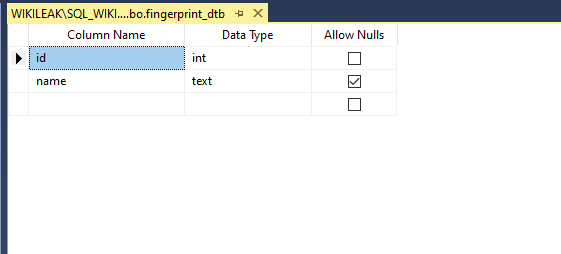
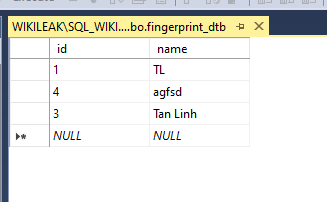
- Mình đã tạo 1 database tên fingerprint_dtb để lưu trữ ID và tên người khi mình add mới vào.
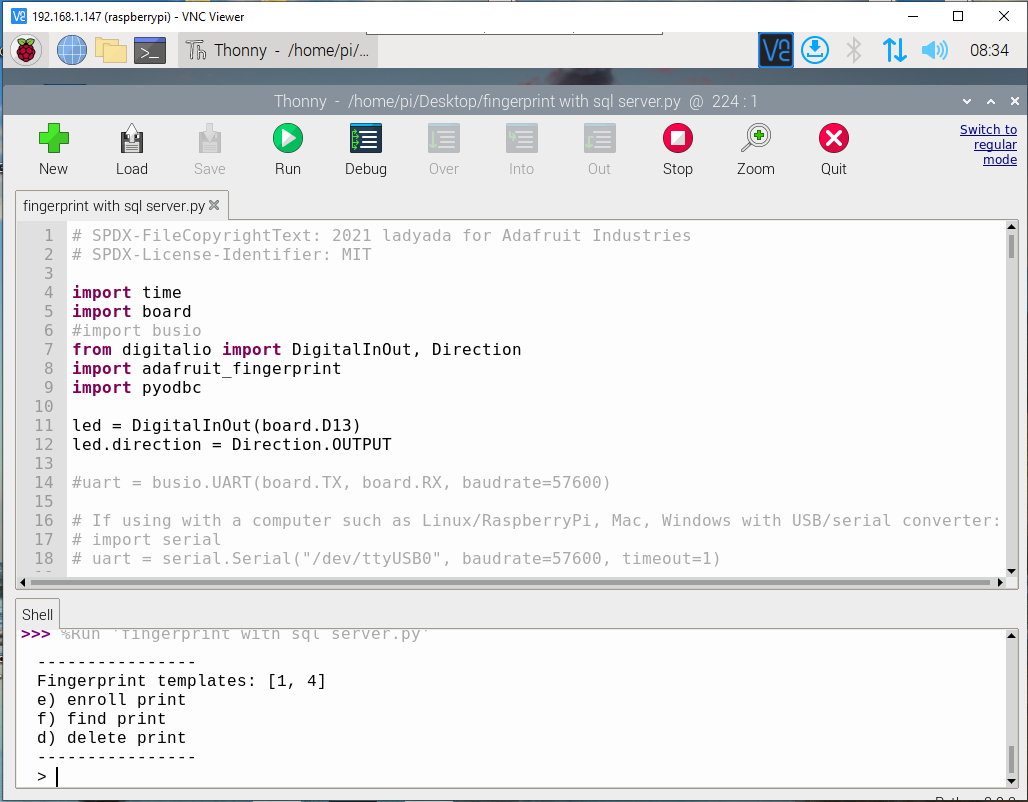
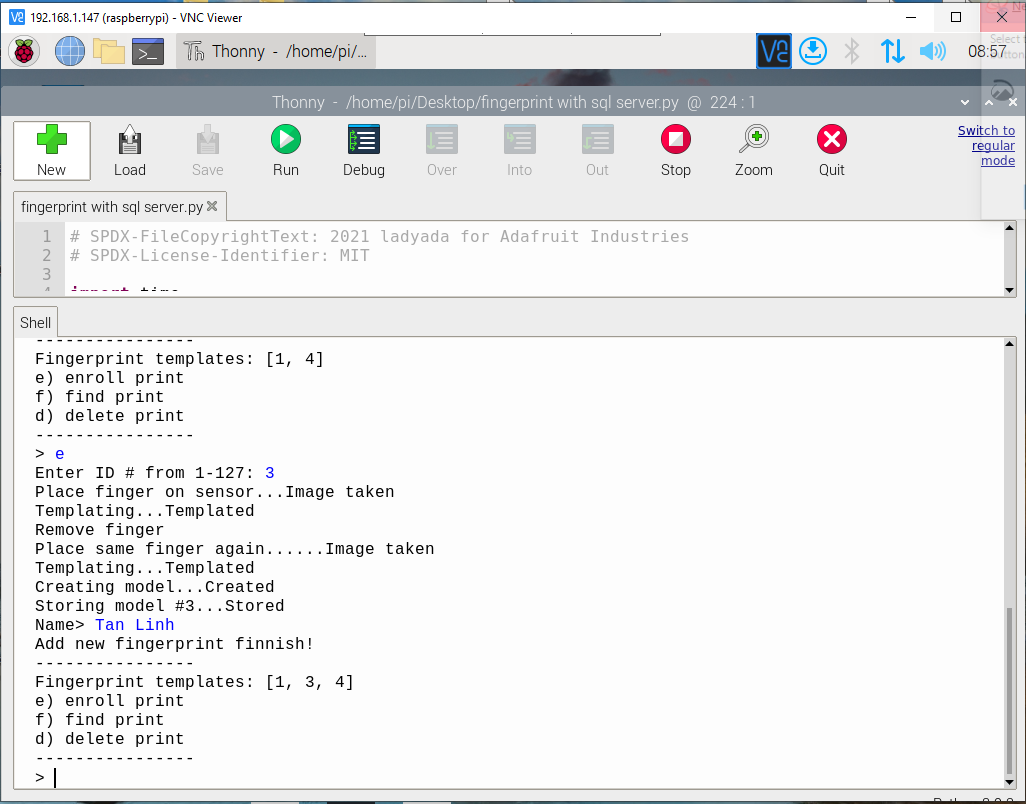
- Khi thực thi code sẽ có 3 chức năng enroll print (tạo ID vân tay mới), find print (kiểm tra vân tay) và delete print (xóa vân tay).
- Các chức năng đều có kết hợp giao tiếp SQL Server để lưu trữ ID vân tay mới vào module và database, kiểm tra vân tay và hiển thị tên người dùng nếu đã lưu trong database, xóa vân tay ở module và cả dữ liệu trong database.
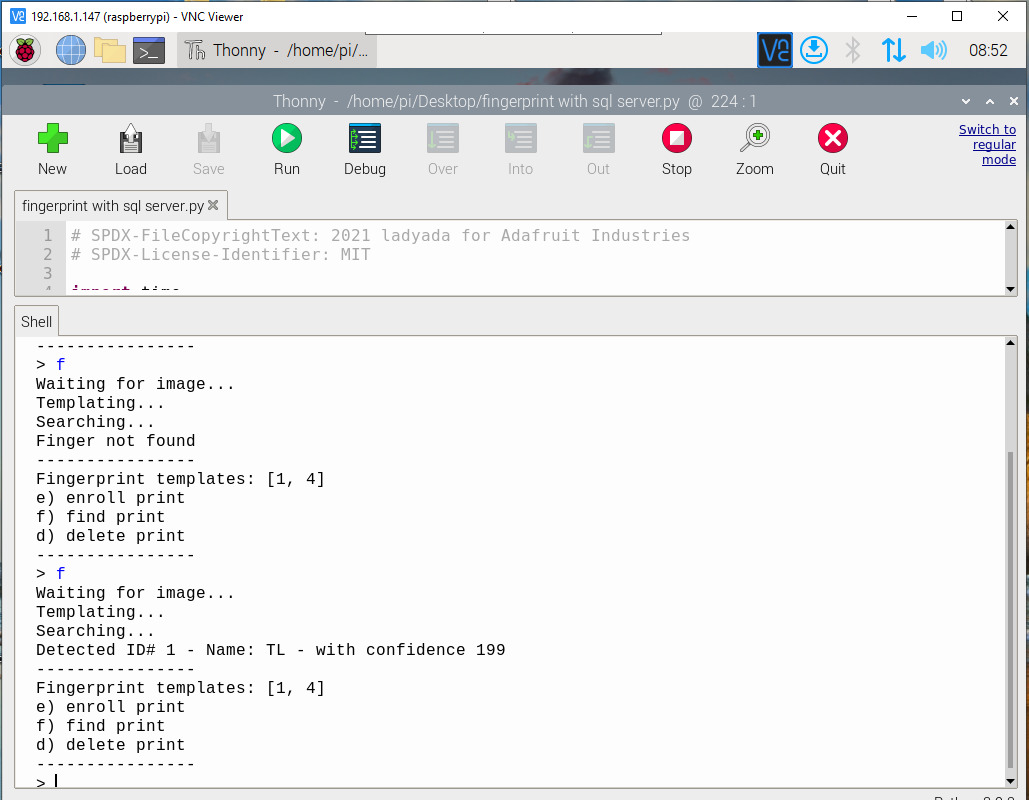
- Khi quét vân tay chưa có trong dữ liệu thì sẽ báo Finger not found
- Với vân tay đã lưu trữ sẽ hiển thị thông báo Detect ID #xxx name:xxx with confidence xxx
- Các chức năng kia bạn hãy tự check và test nó nhé. Trong phần code mình cũng có nhận biết nếu THÊM vân tay mới mà trùng ID có sẵn trong database thì sẽ cập nhật lại tên người mới.
6. Kết luận
Như vậy là 2 phần của chuỗi bài viết chia sẻ về giao tiếp module nhận dạng vân tay AS608 cũng đã hoàn thiện. Cơ bản có, nâng cao cũng có, tuy nhiên mức độ lập trình ở mức cơ bản và sơ sài để các bạn có thể dễ đọc hiểu. Còn khi các bạn hiểu sâu về nó thì các bạn có thể áp dụng để làm ứng dụng của bạn cho sinh động và chuyên sâu hơn nhé. Nếu có thắc mắc hay vấn đề, các bạn có thể cmt bên dưới để mình hỗ trợ giải đáp.
Chúc thành công!
Xem lại phần 1 (giao tiếp với arduino): https://tapit.vn/giao-tiep-cam-bien-nhan-dang-van-tay-as608-phan-1/
Tấn Lĩnh – Atoma Technology
